Generating Fake McDonald's Screenshots With AWS and OpenAI
Posted On: May 01 2023

Table of contents
- My Problem
- Generating Images in the Cloud
- Making the Canvas
- It’s all in the details
- ChatGPT can do (almost) anything
- Training a custom GPT-3 model
- Drawing it all together
- Apple Shortcuts is awesome
- The final product
My Problem
Several months ago, I had a dumb first world problem. Typically my mom likes to order food from McDonald’s using the app, that way she gets points she can redeem for free food. However, in order to pick up at the counter you need to show the order confirmation screen on your phone.
She (being my mother) would then force me to take her phone and pick up the order for her. I don’t mind being the one to pick up the food, but I don’t like having to use her phone to do it.
If only there was a way I could make a fake screenshot of the McDonald’s app with the her order info in it…
Generating Images in the Cloud
A loooong time ago, I made an inventory system built on AWS for a community service thing that donated computers to low income individuals/families. The main thing it was designed to keep track of was all of the computers that we received/refurbished/donated.
Initially, in order to tell which computer was which, we placed masking tape and wrote on them with sharpies. However, people’s (my) handwriting sucked so you often come across many computers with illegible ID numbers. To fix this I wanted to have an app where you could create an entry for a computer and enter in all of its specs and other relevant information. Then it would create a PNG with an ID number and a QR code that could be printed on a label and stuck on the computer.
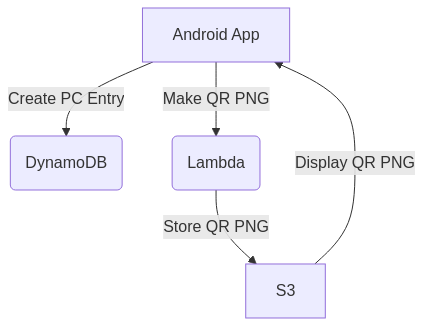
In order to do this, I made an Android app that would create a new entry in a DynamoDB database with all of the appropriate fields. Then the app would trigger a Lambda function that would generate the PNG using information from that entry (ID number and computer type), and upload it to an S3 bucket where it could be accessed elsewhere. Looking back on this, I hate this and I am glad that I don’t have any of this code anymore.
Fundamentally, generating a fake McDonald’s screenshot would be much simpler than this since I don’t need to deal with any of the database stuff. However, unlike these labels which are just text on a white background, I’d need to have a background image and place text on top of it.
Making the Canvas
First I ordered an Oreo McFlurry from a McDonald’s with my phone and took a screenshot of the order confirmation page. I then imported it into GIMP, erased a bunch of stuff within it, and split it into two images, one for the top half and one for the bottom half.


The reason I split it into two images was because I didn’t to have a limit to how many items I could have in the order. If I had stuck with just the original screenshot, the order text could have gone off the bottom of the screen so I figured stitching two images together would be an easy fix.
It’s all in the details
I initially kept the time in the upper left cover, but if I tried ordering at night and the time was 1:00 PM it could potentially give me away. Luckily, Apple really likes using “Helvetica” in their software so I was able to easily download a ttf file and use it to generate the time.
The rest of the text was not so easy to fake. I used an online text analyzer to figure out what font McDonald’s uses, and it wasn’t able to nail it down 100%. Additionally, all of the fonts it was suggesting were paid fonts, so I couldn’t just download them. After some trial and error I settled on “Heebo Black” which isn’t a perfect match, but it’s close enough for a brief glance. If anyone were to take a closer look in comparison to the real app this would probably be the first thing they notice.
Thankfully, because I used Apple Pay when I placed my order, I didn’t have to worry about providing a real debit card number. Without getting too into it, my understanding is that Apple Pay generates a different card number for each transaction. Thus I was able to just use a random number generator to generate a four digit number and use that as the card number.
However, the toughest issue was the cost of the order which I needed a way to guess.
ChatGPT can do (almost) anything
The answer (of course) was to use AI!
Prior to this project, I had been screwing around with OpenAI’s APIs and they are shockingly easy to work with. Plus, they’re super cheap!
To oversimplify a bit, the newer an AI model is the better it is. When I started working on this project OpenAI had released an endpoint for a model called GPT-3.5 Turbo intended for chat (which I think is what ChatGPT uses). (Now they are up to GPT-4) Since that was the best model they had available at that time, I decided to use it.
I got it working pretty quickly, but there were some serious problems. For one, it wasn’t very good at pricing things. Multiple queries with the exact same prompt would yield wildly different results. When guessing how much a Big Mac cost I would get responces that ranged from $2.99 to $5.99. This is because McDonald’s prices vary wildly across America, but whenever I tried to specify SoCal/California pricing it just refused to generate a number.
Additionally, no matter what I gave it as a prompt, I couldn’t get it to output in a standardized format.
For instance, I wanted it to output $2.99 as 2.99 but I would typically get $2.99.
No problem, I can easily use .replace('$', '') to get rid of the dollar sign.
But what was even more frustrating was that I had gotten got outputs like Your cost would be $2.99, Total Cost: 2.99, and others like that instead of just the number I wanted.
I could have tried fixed these problems, but I decided to take a different approach towards using the API.
Training a custom GPT-3 model
Thankfully the chat endpoint wasn’t the only offering OpenAI had with their API.
Something I had been wanting to try for a while was training my own GPT-3 model. In short, its as easy as making a spreadsheet with a bunch of example inputs and outputs, putting it through an OpenAI JSONL formatter, and then uploading it to the API.
So I spent just over an hour going the McDonald’s app for the location I go to and logged the prices for almost everything there. After that I uploaded the data to the API and it took just shy of 30-45 minutes to train. The longest part wasn’t the actual training, but waiting in the queue to get my turn to train

At this point the model I trained was very good at guessing prices for individual menu items. It was even able to provide the correct price even when I mistyped the name of an item. However, it still wasn’t able to generate a total price for multiple items. In order to get around this, I decided to have my code call the API for each item and add each result together.
While I could have added additional training so it could process multiple items at once, I decided not to do that since the API was already pretty fast and this would only shave off a second or two. It’s not worth it for me to spend an hour plus formating the data for that small of a speed increase. Plus, in my experience I don’t trust a GPT-3 model to do addition correctly. While GPT-4 is probably better overall, for my future OpenAI projects I’m going to break up my tasks and combine them with coding instead of trying to do it all in one API call.
Drawing it all together
Now that all the data is loaded, it just needs to be drawn on top of the edited screenshots.
Thankfully drawing is super easy in Python using PIL(Pillow). On my laptop all I had to do was install it with pip, type out a few lines of code, and I was done. The only hard part was figuring out the coordinates for where to draw the text, but that was just a matter of trial and error.
Unfortunately, it wasn’t this easy to use PIL on AWS Lambda. Typically (for Python) you bundle your code and its dependencies into a zip file and upload it to AWS. However, for some reason I couldn’t get my code to run properly on Lambda with its bundled dependencies (in this case PIL). This could have been a big problem since as far as I know, this is the only way to upload pip dependencies to Lambda.
Thankfully, I was able to get around this by using layers. In short, someone else had already bundled PIL into a zip file and uploaded it to AWS. With the ARN of that layer, I was able to use it in my Lambda function without having to bundle it myself. If it weren’t for this guy I would have been kinda screwed.
Overall Azure Functions are a lot easier to work with since you can actually prepackage your code with its dependencies and upload it directly to Azure within VS Code. For this and other reasons, I might consider redeploying this project on Azure in the future.
Apple Shortcuts is awesome
Having a script that can generate a fake McDonald’s order is cool, but it’s not very useful if I have to run it on my laptop every time I want to use it.
Luckily I only had to develop for iOS since it’s what my phone runs and I’m the only one who’s ever going to use this. Unfortunately, I don’t have a Mac so I can’t use Xcode to develop an app. Plus, back then I wasn’t as knowledgeable about web development as I am now.
As it turns out, Apple has a built in app called Shortcuts that lets users create/share scripts that can be run from the home screen or with Siri. Despite the drag and drop interface that is akin to Scratch, it is surprisingly powerful and has access to many system features. For the purposes of this project, it is able to make HTTP requests and save images locally.

So I set up mmy script which asks for the name of the person who placed the order, the items they ordered, and what their order code was. Then it appends this data to a URL and makes a GET request to the AWS Lambda function I set up earlier. From there it downloads the image and saves it to the photos app.
The final product

And with that I was done. I had a means to fake McDonald’s screenshots on my phone in order to not use my mom’s phone. All that was left was to use it in action…
That Saturday I had my mother place an order off of her phone so that I could pick it up using only what I had made. I then walked up to the counter more anxious than I had ever been picking up a Big Mac. The person behind it then barely gave my phone a glance before handing me my order. Success!
Given this response, if I so desired I could easily use this to get free food and steal from McDonald’s and its patrons. However, I am not a criminal and have chosen to never do this. In order to avoid encouraging such bad behaviors (and so that I don’t get sued) I haven’t posted the full code for this project on GitHub. Instead, I only pushed the code and assets for the image generation and the OpenAI API call, the AWS Lambda function, and the Apple Shortcut is not included. If someone so desired, they could probably easily replace those missing parts with their own code. That being said, if you have the know-how to do so, you probably have better things to do.
The (Obvious) Easy Solution to my Dumb Problem
Of course, I immediately set about bragging about what I made to anyone I knew. One person I told was a friend of mine who is a nurse and didn’t fully understand what I was talking about. That being said, she asked a very simple question that I couldn’t answer.
“Why couldn’t you ask your mom to send you a screenshot?”
I was dumbfounded. On this same line of thought, why did I have to create a way for this code to guess the price? I could have easily added a field for me to input the price in the shortcut and it would’ve eliminate the need to use the OpenAI API. However, in hindsight there was a simple answer to this question.
“Why not?”
