Running a Jekyll Dev Server
Posted On: December 12 2023
Written by Julian Lopez
Table of Contents
My Plugin Problem
Here’s a quick breakdown of how my writing process for this blog works. I have a server in my bedroom which I remote into within VS Code my laptop or iPad via VS Code. From there I create and edit markdown files within my Jekyll site repository and publish them via Git. (I’m probably going to be changing my workflow significantly soon thanks to Obsidian, and I’ll write more in depth then.)
In order to preview my website I use a VS Code extension called Jekyll Run. All it really does is run the command bundle exec jekyll serve within your site directory and serves your site at localhost:4000. Since I run it off my server and because I want to test this preview on my phone, I add --host=0.0.0.0 to the launch options of this plugin. This way I can just connect to port 4000 of my server’s IP address from my phone’s web browser and access the preview from there.
The actual preview itself works great, but I’ve been having issues with the plugin not terminating when I disconnect from my server. Thus, when I reconnect and try to launch it again it errors out since the port (4000 in my case) is occupied. There’s a plugin setting that’s meant to fix this, but it does nothing in my case. I suspect that the author of it never tested an SSH use case. I’ve submitted a GitHub Issue, but I doubt I this will get fixed anytime soon.
The Solution
Something I’ve thought of recently is just launching the command bundle exec jekyll serve --host=0.0.0.0 on startup and just leaving it running on my server. It’s a dead simple fix that requires no thought. Besides, now that I’m transitioning my writing to Obsidian for my writing I want to use a plugin called “Permalink Opener” to open a preview of what I’m writing. Switching between Obsidian and VS Code just to activate a plugin wouldn’t the best experience. (It’s got one major issue though that I’m gonna be submitting a PR for soon.)
I also want to change the port I use to something other than 4000 since I might need that open for other applications. That can be easily done by appending -P PORT_NUMBER with you substituting your port number in of course.
To run this command on boot I appended the below line to my crontab file.
@reboot cd PATH_TO_YOUR_JEKYLL_DIRECTORY && bundle exec jekyll serve --host=0.0.0.0 -P PORT_NUMBER
Creating A Jekyll Subdomain
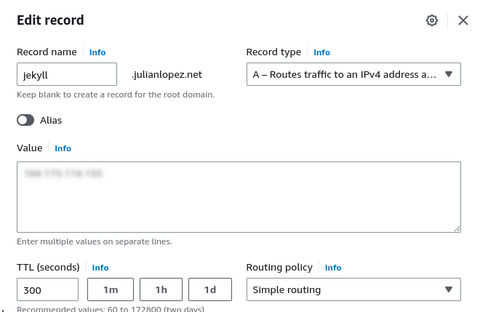
Now while this is perfectly workable so far, I’d rather have a real URL to connect to instead of having to type in a port number after my domain. Thus I decided to add a “jekyll” subdomain to my site. This is literally the same thing as what I wrote about in my previous post on adding subdomains so I won’t be going into too much detail about it here. Below is what I added to my Nginx config and my AWS route 53 settings.
server {
    listen 80;
    server_name jekyll.julianlopez.net;
    location / {
       proxy_pass http://localhost:JEKYLL_PORT;
    }
}

If you’re going to copy what I’m doing, make sure that the port you’re using is open on your router and firewall in addition to Nginx being properly configured. Otherwise, you’ll only be able to access this preview from your local
With that, I’m done! If you want to check out the changes I’m going to be making to my site before I publish them, visit jekyll.julianlopez.net.
-
512KB Club
Green Team
darktheme.club
Member
-
Site Last Updated:
January 18, 2026